- Forums
- Knowledge Base
- Customer Service
- FortiGate
- FortiClient
- FortiAP
- FortiAnalyzer
- FortiADC
- FortiAuthenticator
- FortiBridge
- FortiCache
- FortiCarrier
- FortiCASB
- FortiConnect
- FortiConverter
- FortiCNP
- FortiDAST
- FortiDDoS
- FortiDB
- FortiDNS
- FortiDeceptor
- FortiDevSec
- FortiDirector
- FortiEDR
- FortiExtender
- FortiGate Cloud
- FortiGuard
- FortiHypervisor
- FortiInsight
- FortiIsolator
- FortiMail
- FortiManager
- FortiMonitor
- FortiNAC
- FortiNAC-F
- FortiNDR (on-premise)
- FortiNDRCloud
- FortiPAM
- FortiPortal
- FortiProxy
- FortiRecon
- FortiRecorder
- FortiSandbox
- FortiSASE
- FortiScan
- FortiSIEM
- FortiSOAR
- FortiSwitch
- FortiTester
- FortiToken
- FortiVoice
- FortiWAN
- FortiWeb
- Wireless Controller
- RMA Information and Announcements
- FortiCloud Products
- ZTNA
- 4D Documents
- Customer Service
- Community Groups
- Blogs
- Fortinet Community
- Knowledge Base
- FortiAnalyzer
- Technical Tip: Extending disk space in FortiAnalyz...
- Subscribe to RSS Feed
- Mark as New
- Mark as Read
- Bookmark
- Subscribe
- Printer Friendly Page
- Report Inappropriate Content
Created on
11-15-2017
07:41 AM
Edited on
04-04-2024
08:53 AM
By
chall_FTNT
Description
Solution
Method 1 - Add new virtual disks and extend the logical volume.
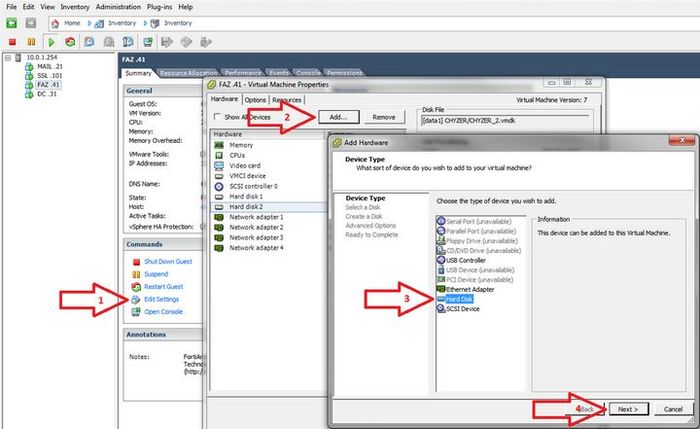
- In the vSphere client: Edit the FortiAnalyzer/FortiManager VM settings.
Select 'Add'…
Select 'Hard Disk' and select 'Next'.


Note:
Since the SQL database operations may consume a lot of disk time, it is recommended to locate the FortiAnalyzer disks on a datastore (physical drive or array) that is not shared with other disk-consuming VMs, in order to avoid performance issues.
Specify the Advanced Options if needed, or select 'Next' and 'Finish' in the next two dialog boxes.
- Run the following command in the FortiAnalyzer/FortiManager CLI:
- Use the following CLI command to extend the file system on the new disk.
exec lvm extend
This operation will need to reboot the system.
Do you want to continue? (y/n)y
Note:
Although the above prompt only mentions a reboot, FortiAnalyzer will first perform a file system check (FSCK). If no errors occur, it will proceed to resize the file system (RESIZE2FS). With large file systems, the file system check may take significantly longer than a simple reboot.
The output below (only visible via the ESXi virtual console) shows the two steps:
The system is going down NOW !!
Rescan disks...
add new disk2: 200GB
Extend /dev/mdvg/mdlv...
Fsck /dev/mdvg/mdlv...
Done, no error.
Resize2fs /dev/mdvg/mdlv...
Please stand by while rebooting the system.
[ 3698.432925]reboot: Restarting system
- Upon reboot, the user will see the changes made from 200Gb 'Unused' to 'Used'. Run the below command again to confirm if the operation is successful:
Before FortiAnalyzer/FortiManager 5.6.6 and 6.0.3, increasing the size of an already used virtual disk required format in order to utilize the additional space.
As of FortiAnalyzer/FortiManager 5.6.6 and 6.0.3:
- The command 'exec lvm extend' no longer requires the selection of specific virtual disks, but instead, it automatically extends the file system over the whole unused disk space.
- As part of the extension, it detects not only the unused new disks but also the expanded disk space on the already used disks.
- Therefore, increasing the provisioned size of an already used virtual disk no longer requires format.
The examples below are from VMware ESXi (vSphere) 6.7.0, but the process is similar for most hypervisor types.
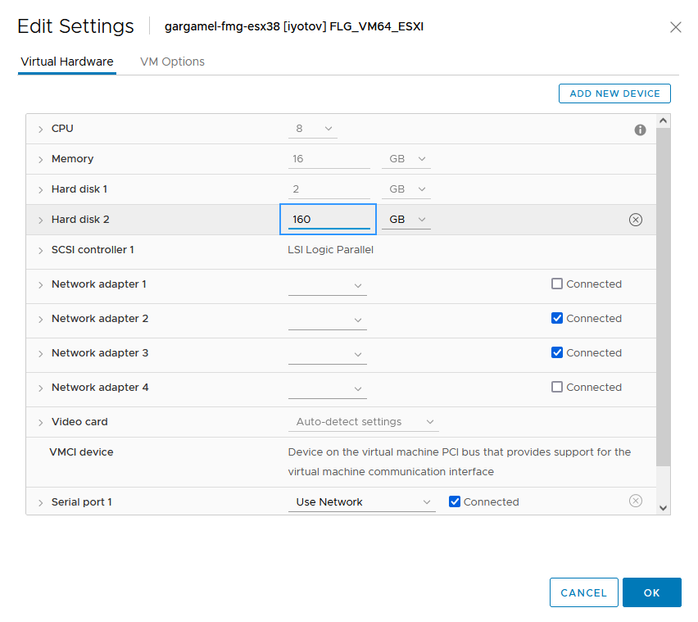
- In the vSphere client, edit the FortiAnalyzer/FortiManager VM settings.
- Increase the size of Hard disk 2, Hard disk 3, etc. as required and select OK.
Note that 'Hard disk 1' listed in vSphere is NOT the same as the 'disk 1' listed by the command 'execute lvm info'.
Do not increase the size of 'Hard disk 1' unless explicitly instructed by Fortinet Technical Support. - Use the CLI command below to confirm if the new disk size is correctly assigned (note that it says Disk1 in the output, but that is in fact disk2 of the VM):
exec lvm info
LVM Status: OK
LVM Size: 150GB
File System: ext4 147GB
Disk1 : Used 150GB of 160GB
Disk2 : Unavailable 0GB
Disk3 : Unavailable 0GB
Disk4 : Unavailable 0GB
Disk5 : Unavailable 0GB
Disk6 : Unavailable 0GB
Disk7 : Unavailable 0GB
Disk8 : Unavailable 0GB
- Use the CLI below to extend the file system:
exec lvm extend
This operation will need to reboot the system.
Do you want to continue? (y/n)y
Note:
Although the above prompt only mentions a reboot, FortiAnalyzer will first perform a file system check (FSCK) and, if no errors, will proceed to resize the file system (RESIZE2FS). With large file systems, the file system check may take significantly longer than a simple reboot.
The output below (only visible via the ESXi virtual console) shows the two steps:
The system is going down NOW !!
Rescan disks...
extend disk1: 160GB
Extend /dev/mdvg/mdlv...
Fsck /dev/mdvg/mdlv...
Done, no error.
Resize2fs /dev/mdvg/mdlv...
Please stand by while rebooting the system.
[5951271.416233] reboot: Restarting system
- Once the system reboots, confirm the new disk size:
exec lvm info
LVM Status: OK
LVM Size: 160GB
File System: ext4 156GB
Disk1 : Used 160GB
Disk2 : Unavailable 0GB
Disk3 : Unavailable 0GB
Disk4 : Unavailable 0GB
Disk5 : Unavailable 0GB
Disk6 : Unavailable 0GB
Disk7 : Unavailable 0GB
Disk8 : Unavailable 0GB
- It is not possible to reduce the LVM disk. The only way is to back up the system config and logs and then proceed to format the disk.
- The maximum size that can be used is limited by the file system type: The ext4 file system can support volumes with sizes up to 1 Exabyte (EB) (1,000 Terabytes = 1018 Bytes) and files with sizes up to 16 Terabytes (TB).
- Technical Tip: How to calculate disk space needed for Archive and Analytics Logs
- Technical Tip: Adding new disks on FortiManager and FortiAnalyzer instances in Microsoft Azure
- Technical Note: Minimizing logging from FortiGate to FortiAnalyzer
- Technical Tip: How to enable FortiManager/FortiAnalyzer VMware ESXi instance to support more than 8x...
- Technical Tip: Reducing VM Storage Size / Removing Disk from LVM
The Fortinet Security Fabric brings together the concepts of convergence and consolidation to provide comprehensive cybersecurity protection for all users, devices, and applications and across all network edges.
Copyright 2024 Fortinet, Inc. All Rights Reserved.
